프프프

Tool

14개 발견

1. 포터블 경로 추가 (Sublime Text 3)


SublimeLinter.sublime-setting.json (SublimeLinter setting)


"paths": {

    "linux": [],

    "osx": [],

    "windows": [

        "/NodeJSPortable/Data",  //현재 npm package 가 설치되어 있는 경로

        "/NodeJSPortable/App/NodeJS"  //현재 NodeJS.exe 가 존재하는 경로

    ]

}


2. 사용자 변수 추가 (윈도우)


시스템 >고급 시스템 설정 > 환경변수


Path

C:\NodeJSPortable\App\NodeJS //현재 NodeJS.exe 가 존재하는 경로


SublimeLinter setting 에서 복수 경로 입력이 가능 하니 사용자 변수를 추가적으로 설정해줄 필요는 없다.


'Tool' 카테고리의 다른 글

Markdown 문법  (0) 2016.12.08
댓글 로드 중…

트랙백을 확인할 수 있습니다

URL을 배껴둬서 트랙백을 보낼 수 있습니다

Markdown 문법

2016. 12. 8. 10:32 - 진징
  • 제목
    # 텍스트
    #을 하나 쓰면 HTML의 <h1> 태그를, #을 두개 쓰면 <h2>태그를 의미한다. 즉, #은 하나에서 여섯개까지 쓸 수 있고, #이 늘어날때마다 제목의 수준은 내려간다.(보통 글씨 크기가 작아진다.)
  • 번호 없는 리스트
    -/+/* 텍스트
  • 번호 있는 리스트
    숫자. 리스트
  • 기울인 글씨 (html의 <em>태그)
    *텍스트* or _텍스트_
  • 굵은 글씨 (html의 <strong>태그)
    **텍스트** or __텍스트__
  • 인용
    > 텍스트
    인용문안에 인용문을 넣으려면 >를 더 추가해주면 된다.
  • 인라인 링크
    [텍스트](링크주소)
  • 참조 링크
    [텍스트][참조명]
    [참조명]: 링크주소
  • 이미지
    ![텍스트](이미지링크)
  • 수평선
    -, *, _을 세개 이상 나열
  • 코드
    \`코드 내용\`
  • 코드 블럭
    앞에 스페이스 4개 이상 삽입


'Tool' 카테고리의 다른 글

NodeJS portable SublimeLinter 연결 설정  (0) 2017.01.24
댓글 로드 중…

트랙백을 확인할 수 있습니다

URL을 배껴둬서 트랙백을 보낼 수 있습니다


'Tool > Atom' 카테고리의 다른 글

Atom 단축키 변경하기  (0) 2016.12.03
Atom emmet tab 활성화 (jsp, php 등)  (0) 2016.11.24
댓글 로드 중…

트랙백을 확인할 수 있습니다

URL을 배껴둬서 트랙백을 보낼 수 있습니다

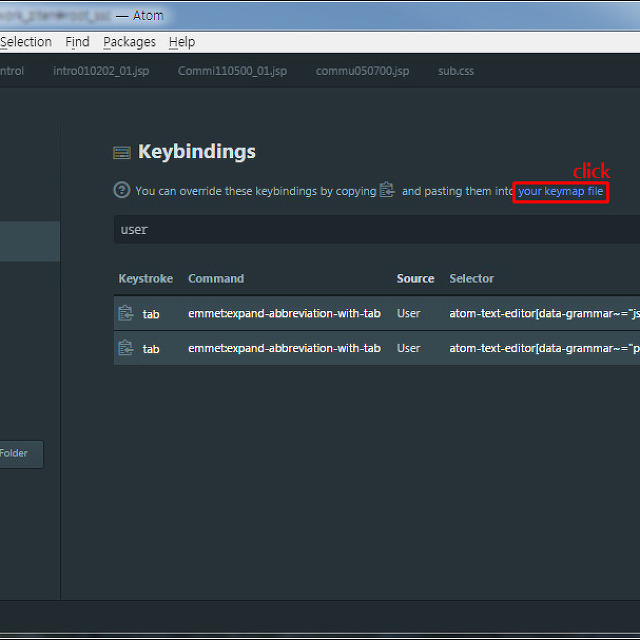
1. setting -> keybindings 에서 your keymap file 클릭

2. keymap.cson에 내용 추가

'Tool > Atom' 카테고리의 다른 글

Atom Package List  (0) 2016.12.04
Atom emmet tab 활성화 (jsp, php 등)  (0) 2016.11.24
댓글 로드 중…

트랙백을 확인할 수 있습니다

URL을 배껴둬서 트랙백을 보낼 수 있습니다

html 파일에서는 tab으로 emmet 기능이 확장이 잘 되었는데 jsp나 php 같은 곳에서는 tab키로 확장이 되지 않았다.

jsp나 php 파일에서도 쓸 수 있도록 옵션을 추가해주어야 한다.


1. setting -> keybindings 에서 your keymap file 클릭


2. keymap.cson 에 내용 추가


#해당 내용

'Tool > Atom' 카테고리의 다른 글

Atom Package List  (0) 2016.12.04
Atom 단축키 변경하기  (0) 2016.12.03
댓글 로드 중…

트랙백을 확인할 수 있습니다

URL을 배껴둬서 트랙백을 보낼 수 있습니다

1. gitlab.com 가입

2. userid.gitlab.io 프로젝트 생성

3. local저장소로 git clone

4. GitLab CI 설정

local에서 .gitlab-ci.yml 생성 후 내용 삽입 (https://gitlab.com/pages/plain-html)

host-from-root로 설정했다. 기본설정은 public폴더 안에 파일을 생성해야 하는 듯

5. html, css, js 등 작성한 파일등을 gitlab 저장소로 push

6. http://userid.gitlab.io 에서 확인


GitLab의 장점은 private저장소를 무한으로 사용 할 수 있다는 것이다.

'Tool > Git' 카테고리의 다른 글

자주사용하는 git 명령어  (0) 2016.11.16
git 명령어  (0) 2016.10.27
댓글 로드 중…

트랙백을 확인할 수 있습니다

URL을 배껴둬서 트랙백을 보낼 수 있습니다

$ git log --name-only log에서 변경된 파일명 보기
$ git checkout -b [name]  [name] 브랜치 생성하면서 [name] 브랜치로 체크아웃
$ git branch [name] [name] 브랜치 생성
$ git checkout [name] 체크아웃
$ git merge [branch-name] 현재 브랜치에 [branch-name] branch 병합
$ git branch -d [name] [name] 브랜치 삭제
$ git config --global alias.st status 단축키 설정하기
$ git remote show [name] [name] remote 모든정보보기
$ git branch -vv 로컬브랜치목록, 추적하고 있는 리모트 브랜치목록
$ git branch -d [branch-name] local [branch-name] branch 삭제
$ git push origin --delete [branch-name] remote [branch-name] branch 삭제

Pull, Fetch의 차이점은 무엇인가!

Fetch : 중앙 저장소의 소스를 로컬 저장소로 가져온다!  그러나 현재 작업중인 소스들을 변경하는 Merge 작업을 하지는 않는다

Pull : 중앙 저장소의 소스를 로컬 저장소로 가져온다! 또한 현재 작업중인 소스들의 Merge 작업까지 통합하여 수행한다


비밀번호를 매번 입력하지 않아도 된다

HTTPS URL로 시작하는 리모트 저장소를 사용한다면 아마도 Push 나 Pull을 할 때 인증을 위한 사용자 이름이나 비밀번호를 묻는 것을 볼 수 있다. 보통 터미널에서 작업하는 경우 Git이 이 정보를 사용자로부터 받기 위해 사용자 이름이나 비밀번호를 입력받아 서버로 전달해서 권한을 확인한다.

이 리모트에 접근할 때마다 매번 ID나 비밀번호를 입력하지 않도록 “crediential cache” 기능을 이용할 수 있다. 이 기능을 활성화하면 Git은 몇 분 동안 입력한 ID나 비밀번호를 저장해둔다. 이 기능을 활성화하려면 git config --global credential.helper cache 명령을 실행하여 환경설정을 추가한다.

이 기능이 제공하는 다른 옵션에 대한 자세한 설명은 “Credential 저장소”를 참고한다.

참고: https://git-scm.com/book/ko/v1/Git-%EB%B8%8C%EB%9E%9C%EC%B9%98-%EB%B8%8C%EB%9E%9C%EC%B9%98%EC%99%80-Merge%EC%9D%98-%EA%B8%B0%EC%B4%88

'Tool > Git' 카테고리의 다른 글

GitLab Pages Plane-HTML 생성  (0) 2016.11.23
git 명령어  (0) 2016.10.27
댓글 로드 중…

트랙백을 확인할 수 있습니다

URL을 배껴둬서 트랙백을 보낼 수 있습니다

1
2
3
4
5
6
7
8
9
10
11
12
13
14
15
16
17
18
19
20
21
22
23
24
25
26
27
28
29
30
31
32
33
34
35
36
37
38
{
    "always_show_minimap_viewport"true// 미니맵에서 현재 위치 시각화하기
    "draw_minimap_border"true// 미니맵 현재 위치 시각화에 테두리 표기하기
    "bold_folder_labels"true// 폴더 굵게 표시
    "auto_complete"false// 자동완성기능
    "match_brackets_angle"true// 꺽쇠 괄호 강조
    "trim_trailing_white_space_on_save"true// 저장 후 자동 공백 제거
    "open_files_in_new_window"true// 새 파일 새창 띄우기
    "save_on_focus_lost"true// 포커스를 잃으면 자동 저장
    "folder_exclude_patterns":  // 사이드바에서 제외할 파일/폴더
        [
            ".svn",
            ".git",
            ".hg",
            "CVS",
            "_gsdata_",
            ".sass-cache"
        ],
    "font_face""맑은 고딕"// 폰트 지정
    "font_size"12// 폰트 크기
    "highlight_line"true,  // 현재 커서 라인 하이라이트
    "highlight_modified_tabs"true// 수정된 파일 탭 하이라이트
    "ignored_packages"// 제외할 패키지 목록
        [
            "Markdown",
            "Vintage"
        ],
    "line_padding_bottom"2// 라인 하단 여백
    "line_padding_top"2// 라인 상단 여백
    "match_brackets_angle"true,
    "show_encoding"true,  // 하단 상태 표시줄에 Encoding 표시
    "show_line_endings"true// 하단 상태 표시줄에 Line Ending 표시
    "tab_size"4// 탭 사이즈
    "translate_tabs_to_spaces"true// 탭키 공백을 스페이스로 사용
    "theme""Flatland Dark.sublime-theme"// 테마 선택
    "trim_trailing_white_space_on_save"true // 저장 시 라인 맨 끝 공백 삭제
}
 

'Tool > Sublime Text' 카테고리의 다른 글

SublimeText3 macOS 단축키  (0) 2016.10.23
SublimeText3 UTF-8 단축키 설정  (0) 2016.10.11
Sublime Text sftp 설정  (0) 2016.09.21
SublimeText3 한글 인코딩(EUC-KR) 사용하기  (0) 2016.09.21
Sublimelinter 플러그인 깔기  (2) 2016.07.17
댓글 로드 중…

트랙백을 확인할 수 있습니다

URL을 배껴둬서 트랙백을 보낼 수 있습니다

git 명령어

2016. 10. 27. 10:03 - 진징
git config --global user.name [user name] 작업자 이름 설정
git config --global user.email [user email] 이메일 설정
git config --global --list 설정값(이름 및 메일등 ) 확인
   
git init git 저장소(repo) 만들기
 
git remote add [remote name] [remote addres] 원격지주소를 저장
git remote rm [remote name] 별명의 원격지를 삭제
git remote rename [remote name] [new name] 새로운 별명으로 변경
   
git fetch [remote name] remoet의 모든 정보를 가져옴(모든 branch)
   
git pull 저장소에서 변경 내용 가져오기
   
git push commit들을 master 저장소에 저장
git push [remote name] [localbranch name] branch의 내용을 업데이트
git push [server] tag [TAG] server에 tag 전송
git push [server] --tags 변경된 모든 tag 전송
git push [server] [L.B]:[R:B] server 에 local branch 를 -Remote branch이름으로저장
   
git tag [TAG NAME] 저장소에 태그를 붙인다.
git tag 태그목록을 본다.
git branch [branch name] 저장소의 branch name으로 branch를 만든다.
git branch branch 목록을 본다.
git branch -a 현재 생성된 모든 local branch와 reomte branch 확인
   
git checkout [branch name] 다른 브랜치로 전환
git checkout -b [branch name] branch 생성
git checkout [file or folder] git repo 기준 마지막 commit 상태로 돌림
git checkout [id] [file or folder] git repo 기준 id에 해당하는 commit 상태로 돌림
git checkout -f 아직 commit 되지 않은 working tree와 -index 수정정사항 모두 사라짐
   
git merge [branch name] branch의 내용을 가져와 합침
git add [file or folder] git에 file 또는 folder 추가
git add * git에 모든 file 또는 folder 추가
git rm [file or folder] git 파일 또는 폴더 제거
git status 현재 git 상태 보기
git commit -m [message] message를 repo에 저장
git diff local과 remote의 차이점을 보여줌
git remote  remote서버 확인


'Tool > Git' 카테고리의 다른 글

GitLab Pages Plane-HTML 생성  (0) 2016.11.23
자주사용하는 git 명령어  (0) 2016.11.16
댓글 로드 중…

트랙백을 확인할 수 있습니다

URL을 배껴둬서 트랙백을 보낼 수 있습니다

/*

On OS X, basic text manipulations (left, right, command+left, etc) make use of the system key bindings,

and don't need to be repeated here. Anything listed here will take precedence, however.

*/

{ "keys": ["super+alt+s"], "command": "save_all" }, // 모든 파일 저장


{ "keys": ["super+k", "super+b"], "command": "toggle_side_bar" }, // 사이드바 열기 **

{ "keys": ["super+ctrl+f"], "command": "toggle_full_screen" }, // 전체화면


{ "keys": ["super+option+v"], "command": "paste_from_history" }, // 복사 히스토리 열기 *


{ "keys": ["ctrl+alt+up"], "command": "scroll_lines", "args": {"amount": 1.0} }, // 화면 한줄씩 위로 이동

{ "keys": ["ctrl+alt+down"], "command": "scroll_lines", "args": {"amount": -1.0} }, // 화면 한줄씩 아래로 이동


{ "keys": ["ctrl+shift+up"], "command": "select_lines", "args": {"forward": false} }, // 다중 선택 *****

{ "keys": ["ctrl+shift+down"], "command": "select_lines", "args": {"forward": true} }, // 다중 선택 *****


{ "keys": ["super+shift+["], "command": "prev_view" }, // 탭 이동 ***

{ "keys": ["super+shift+]"], "command": "next_view" }, // 탭 이동 ***

{ "keys": ["super+alt+left"], "command": "prev_view" }, // 탭 이동 ***

{ "keys": ["super+alt+right"], "command": "next_view" }, // 탭 이동 ***


{ "keys": ["super+]"], "command": "indent" }, // 들여 쓰기

{ "keys": ["super+["], "command": "unindent" }, // 내어 쓰기


{ "keys": ["super+l"], "command": "expand_selection", "args": {"to": "line"} }, // 한줄단위로 선택

{ "keys": ["super+d"], "command": "find_under_expand" }, // 동일 단어 다중 선택 *****

{ "keys": ["super+k", "super+d"], "command": "find_under_expand_skip" }, // 동일 단어 다중 선택 제외 **

{ "keys": ["super+shift+space"], "command": "expand_selection", "args": {"to": "scope"} },

{ "keys": ["ctrl+shift+m"], "command": "expand_selection", "args": {"to": "brackets"} },

{ "keys": ["ctrl+m"], "command": "move_to", "args": {"to": "brackets"} },

{ "keys": ["super+shift+j"], "command": "expand_selection", "args": {"to": "indentation"} },

{ "keys": ["super+shift+a"], "command": "expand_selection", "args": {"to": "tag"} },


{ "keys": ["super+alt+."], "command": "close_tag" }, // 태그 닫기


{ "keys": ["ctrl+minus"], "command": "jump_back" }, // 이전 작업 부분으로 이동 (전체 파일)

{ "keys": ["ctrl+shift+minus"], "command": "jump_forward" }, // 최근 작업 부분으로 이동 (전체 파일)


{ "keys": ["super+i"], "command": "show_panel", "args": {"panel": "incremental_find", "reverse": false} }, // 다음 단어 찾기

{ "keys": ["super+shift+i"], "command": "show_panel", "args": {"panel": "incremental_find", "reverse": true} }, // 이전 단어 찾기


{ "keys": ["alt+super+g"], "command": "find_under" }, // 다음 선택 단어로 이동

{ "keys": ["shift+alt+super+g"], "command": "find_under_prev" }, // 이전 선택 단어로 이동

{ "keys": ["ctrl+super+g"], "command": "find_all_under" }, // 단어 전체 선택


{ "keys": ["super+shift+f"], "command": "show_panel", "args": {"panel": "find_in_files"} }, // 전체 파일 찾기 *****

{ "keys": ["f4"], "command": "next_result" }, // 전체 파일 찾기의 다음 부분으로 이동 (전체 파일)

{ "keys": ["shift+f4"], "command": "prev_result" }, // 전체 파일 찾기의 이전 부분으로 이동 (전체 파일)


{ "keys": ["ctrl+super+up"], "command": "swap_line_up" }, // 커서 라인 상단으로 이동 *

{ "keys": ["ctrl+super+down"], "command": "swap_line_down" }, // 커서 라인 하단으로 이동 *


{ "keys": ["super+forward_slash"], "command": "toggle_comment", "args": { "block": false } },

{ "keys": ["super+alt+forward_slash"], "command": "toggle_comment", "args": { "block": true } },


{ "keys": ["super+j"], "command": "join_lines" }, // 라인 합치기

{ "keys": ["super+shift+d"], "command": "duplicate_line" }, // 라인 복사 **


{ "keys": ["super+alt+p"], "command": "show_scope_name" },


{ "keys": ["super+k", "super+up"], "command": "new_pane" }, // 새로운 구분 창 추가하면서 해당 창으로 이동


{ "keys": ["super+k", "super+u"], "command": "upper_case" }, // 대문자로

{ "keys": ["super+k", "super+l"], "command": "lower_case" }, // 소문자로


{ "keys": ["super+alt+["], "command": "fold" }, // 해당 블록 접기

{ "keys": ["super+alt+]"], "command": "unfold" }, // 해당 블록 펴기

{ "keys": ["super+k", "super+1"], "command": "fold_by_level", "args": {"level": 1} }, // 접기 레벨1

{ "keys": ["super+k", "super+2"], "command": "fold_by_level", "args": {"level": 2} }, // 접기 레벨2 

{ "keys": ["super+k", "super+3"], "command": "fold_by_level", "args": {"level": 3} }, // 접기 레벨3

{ "keys": ["super+k", "super+4"], "command": "fold_by_level", "args": {"level": 4} }, // 접기 레벨4

{ "keys": ["super+k", "super+5"], "command": "fold_by_level", "args": {"level": 5} }, // 접기 레벨5

{ "keys": ["super+k", "super+6"], "command": "fold_by_level", "args": {"level": 6} }, // 접기 레벨6

{ "keys": ["super+k", "super+7"], "command": "fold_by_level", "args": {"level": 7} }, // 접기 레벨7

{ "keys": ["super+k", "super+8"], "command": "fold_by_level", "args": {"level": 8} }, // 접기 레벨8

{ "keys": ["super+k", "super+9"], "command": "fold_by_level", "args": {"level": 9} }, // 접기 레벨9

{ "keys": ["super+k", "super+0"], "command": "unfold_all" }, // 모두 펴기

{ "keys": ["super+k", "super+j"], "command": "unfold_all" }, // 모두 펴기

{ "keys": ["super+k", "super+t"], "command": "fold_tag_attributes" },


{ "keys": ["super+alt+o"], "command": "toggle_overwrite" }, // 커서 삽입, 수정 전환


'Tool > Sublime Text' 카테고리의 다른 글

SublimeText3 Settings  (0) 2016.11.09
SublimeText3 UTF-8 단축키 설정  (0) 2016.10.11
Sublime Text sftp 설정  (0) 2016.09.21
SublimeText3 한글 인코딩(EUC-KR) 사용하기  (0) 2016.09.21
Sublimelinter 플러그인 깔기  (2) 2016.07.17
댓글 로드 중…

트랙백을 확인할 수 있습니다

URL을 배껴둬서 트랙백을 보낼 수 있습니다

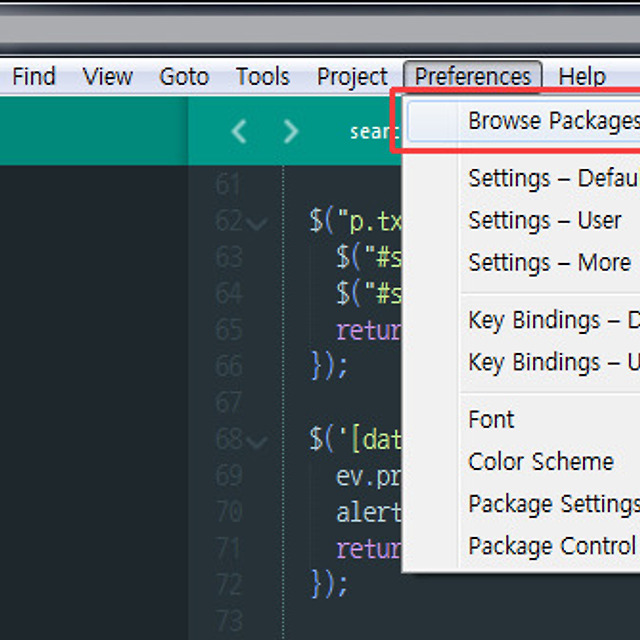
1. 서브라임에서 Package 들이 있는 폴더를 열어 준다.


2. ConvertToUTF8 열기


3. 자신이 사용하는 os에 맞는 파일을 열어서 수정해준다.


-수정해야 할 사항-

ctrl+shift+c    ctrl+shift+x (웹브라우저 개발자도구 단축키와 중복)

GBK    UTF-8

1
"keys": ["ctrl+shift+c"], "command""convert_to_utf8""args": {"encoding""GBK""stamp""0" }
cs


1
"keys": ["ctrl+shift+x"], "command""convert_to_utf8""args": {"encoding""UTF-8""stamp""0" }
cs


'Tool > Sublime Text' 카테고리의 다른 글

SublimeText3 Settings  (0) 2016.11.09
SublimeText3 macOS 단축키  (0) 2016.10.23
Sublime Text sftp 설정  (0) 2016.09.21
SublimeText3 한글 인코딩(EUC-KR) 사용하기  (0) 2016.09.21
Sublimelinter 플러그인 깔기  (2) 2016.07.17
댓글 로드 중…

트랙백을 확인할 수 있습니다

URL을 배껴둬서 트랙백을 보낼 수 있습니다
1
2
3
4
5
6
7
8
9
10
11
12
13
14
15
16
17
18
19
20
21
22
23
24
25
26
27
28
29
30
31
32
33
34
35
36
37
38
39
40
41
42
43
    // The tab key will cycle through the settings when first created
    // Visit http://wbond.net/sublime_packages/sftp/settings for help
 
    // sftp, ftp or ftps
    "type""ftp",//sftp를 사용 한다면 sftp로 변경
 
    "save_before_upload"true,
    "upload_on_save"true//save 할때 서버로 자동 업로드
    "sync_down_on_open"false,
    "sync_skip_deletes"false,
    "sync_same_age"true,
    "confirm_downloads"false,
    "confirm_sync"true,
    "confirm_overwrite_newer"false,
 
    "host""ftp도메인주소",
    "user""아이디",
    "password""비번",
    //"port": "22",
 
    "remote_path""루트폴더"//ex) ftp프로그램으로 접속시 www라면 (/www/)
    "ignore_regexes": [
        "\\.sublime-(project|workspace)""sftp-config(-alt\\d?)?\\.json",
        "sftp-settings\\.json""/venv/""\\.svn/""\\.hg/""\\.git/",
        "\\.bzr""_darcs""CVS""\\.DS_Store""Thumbs\\.db""desktop\\.ini"
    ],
    //"file_permissions": "664",
    //"dir_permissions": "775",
 
    //"extra_list_connections": 0,
 
    "connect_timeout"30,
    //"keepalive": 120,
    //"ftp_passive_mode": true,
    //"ftp_obey_passive_host": false,
    //"ssh_key_file": "~/.ssh/id_rsa",
    //"sftp_flags": ["-F", "/path/to/ssh_config"],
 
    //"preserve_modification_times": false,
    //"remote_time_offset_in_hours": 0,
    "remote_encoding""cp949", //서버에 한글파일이 있다면 cp949 설정
    //"remote_locale": "C",
    //"allow_config_upload": false,
cs


'Tool > Sublime Text' 카테고리의 다른 글

SublimeText3 Settings  (0) 2016.11.09
SublimeText3 macOS 단축키  (0) 2016.10.23
SublimeText3 UTF-8 단축키 설정  (0) 2016.10.11
SublimeText3 한글 인코딩(EUC-KR) 사용하기  (0) 2016.09.21
Sublimelinter 플러그인 깔기  (2) 2016.07.17
댓글 로드 중…

트랙백을 확인할 수 있습니다

URL을 배껴둬서 트랙백을 보낼 수 있습니다

SublimeText 3 는 기본으로 utf-8 인코딩을 사용한다.
만약 euc-kr 로 작성된 코드를 읽고 싶다는 ConvertToUTF8 패키지를 설치하자.

Ctrl + Shift + P -> install package -> ConvertToUTF8 설치

sublimetext 3 재시작하면 file 메뉴에 아래 항목이 생긴다.
Set File Encdoing To (인코딩을 변경해서 파일 저장)
Reload With Encoding (선택한 인코딩으로 다시 파일 로드)

사실 이제부터 euc-kr 파일을 읽으면 Reload with Encoding 사용하지 않고도 알아서 인코딩이 선택된다.
ConvertToUTF8.sublime-settings(Preferences -> Package Settings -> ConvertToUTF8 -> Settgins - Default) 설정에 다음과 같이 기본 설정되어 있다.
// Convert when loading/saving a file
"convert_on_load" : true,
"convert_on_save" : true


ConvertToUTF8 디폴트 메뉴는 다음과 같다.
Chinese Simplified(GBK) 중국어 간체
Chinese Traditional(BIG5) 중국어 번체
Korean (EUC-KR) CP949 도
Japanese (CP932)
Japanese (Shift_JIS)
Japanese (EUC-JP)

메뉴에는 없지만 CP949 도 지원한다.

'Tool > Sublime Text' 카테고리의 다른 글

SublimeText3 Settings  (0) 2016.11.09
SublimeText3 macOS 단축키  (0) 2016.10.23
SublimeText3 UTF-8 단축키 설정  (0) 2016.10.11
Sublime Text sftp 설정  (0) 2016.09.21
Sublimelinter 플러그인 깔기  (2) 2016.07.17
댓글 로드 중…

트랙백을 확인할 수 있습니다

URL을 배껴둬서 트랙백을 보낼 수 있습니다

<설치 순서>


1. node.js 설치


2. sublimelinter 플러그인 설치


3. sublimelinter 추가 플러그인 설치

(sublimelinter-csslint

sublimelinter-jshint

sublimelinter-contrib-htmlhint 등)


4. 플러그인이 설치되는 해당 폴더에 권한부여 (OS X 만 해당)

//OS X 의 경우

권한이 필요 한 것으로 보인다


파일이 깔리는 곳의 폴더 권한

sudo chown -R 사용자이름 /usr/local/lib/node_modules


파일 링크가 걸리는 곳의 폴더 권한

sudo chown -R 사용자이름 /usr/local/bin


(OS X 경로는 대부분 비슷한거 같다. 경로를 모르겠으면 아래 터미널 명령어 npm intall -g 플러그인이름 을 쳐보면 경로가 나오면서 권한이 없다고 뜰 것이다. 나와있는 경로 맞춰서 권한 부여해주면 끝)


5. 터미널을 열어서 명령어로 플러그인 수동 설치

터미널 명령어

npm install -g 플러그인이름


예)

npm install -g jshint

npm install -g csslint

npm install -g htmlhint


jshint --version //인스톨 확인


(package control 을 통해서 깔면 별도의 터미널 명령어가 필요없다고 나와있는 것 같은데 직접 해본 결과 window, os x 두 os 모두 실행되지 않는 것을 발견하였다. 물론 나만 해당되는 문제일 수도 있다.

결과적으로 package control을 통해 설치파일을 깔아주고 터미널을 통해 명령어를 입력하여서 다시 깔아주었더니 작동하는것이 확인되었다.

html-tidy lint 는 그냥 안되는건지 안되더라.)


경로가 맞지 않는다고 뜬다면 경로 설정도 필요하다. (경로의 경우 다를 수 있음)


"paths": {

            "linux": [],

            "osx": [

                "/usr/local/lib/node_modules"

            ],

            "windows": []

}


6. sublime text 재시동


-끝-


-----------------------------------


csslint 오류 옵션설정 (무시하고 싶은 경고 들)


"csslint": {

    "@disable": false,

    "args": [],

    "errors": "",

    "excludes": [],

    "ignore": [

        "important",

        "adjoining-classes",

        "import",

        "ids",

        "box-model",

        "box-sizing",

        "qualified-headings",

        "unique-headings",

        "floats",

        "font-sizes",

        "duplicate-background-images",

        "order-alphabetical",

        "fallback-colors",

        "overqualified-elements"

    ],

    "warnings": ""

},


-ignore 옵션 설명-

"important",   // Disallow !important

"adjoining-classes",   // Disallow adjoining classes

"import",   // Disallow @import

"ids",   // Disallow IDs in selectors

"box-model",   // Beware of box model size

"box-sizing",   // Disallow box-sizing

"qualified-headings",   // Disallow qualified headings

"unique-headings",   // Headings should only be defined once

"floats",   // Disallow too many floats

"font-sizes",   // Don't use too many font-size declarations

"duplicate-background-images",   // Disallow duplicate background images

"fallback-colors",   // Require fallback colors

"overqualified-elements",   // Disallow overqualified elements

"order-alphabetical"


---------- 2016-10-19 추가

//node_moduels 설치되는 경로 (windows)

C:\Users\Administrator\AppData\Roaming\npm


//설정된 lint rule을 추가하거나 변경하려면 이곳에서 수정

ex) csslint 경우

C:\Users\Administrator\AppData\Roaming\npm\node_modules\csslint\node_modules\parserlib\lib\node-parserlib.js


'Tool > Sublime Text' 카테고리의 다른 글

SublimeText3 Settings  (0) 2016.11.09
SublimeText3 macOS 단축키  (0) 2016.10.23
SublimeText3 UTF-8 단축키 설정  (0) 2016.10.11
Sublime Text sftp 설정  (0) 2016.09.21
SublimeText3 한글 인코딩(EUC-KR) 사용하기  (0) 2016.09.21
댓글 로드 중…

트랙백을 확인할 수 있습니다

URL을 배껴둬서 트랙백을 보낼 수 있습니다